Here’s a fun little project I made with a very expensive doll and a couple of very cheap electronics components.
In this tutorial I actually place the camera inside of a doll’s head, but you could just use this tutorial to place the webcam anywhere you like.
To build this hidden spycam you will need the following:
1. An ESP32 CAM module with lens. Make sure you buy the ESP32 CAM module and not the regular ESP32!
2. An FT232RL mini USB to TTL serial converter.
3. 5 female to female Dupont jumper cables.
4. A mini USB A cable that is designed to carry data.
If you want to put your spy cam anywhere then you’ll also need a USB powerbank to power the device. Any USB powerbank will do because the power requirements for the ESP32 CAM module are very modest.
You can buy all of this on Amazon, eBay or AliExpress. I tend to buy my electronics components on Amazon now, but if you do the same then try to find a vendor that ships the components from warehouses in your own country rather than from China.
Finally you’ll need a regular wifi network with SSID and password authentication.
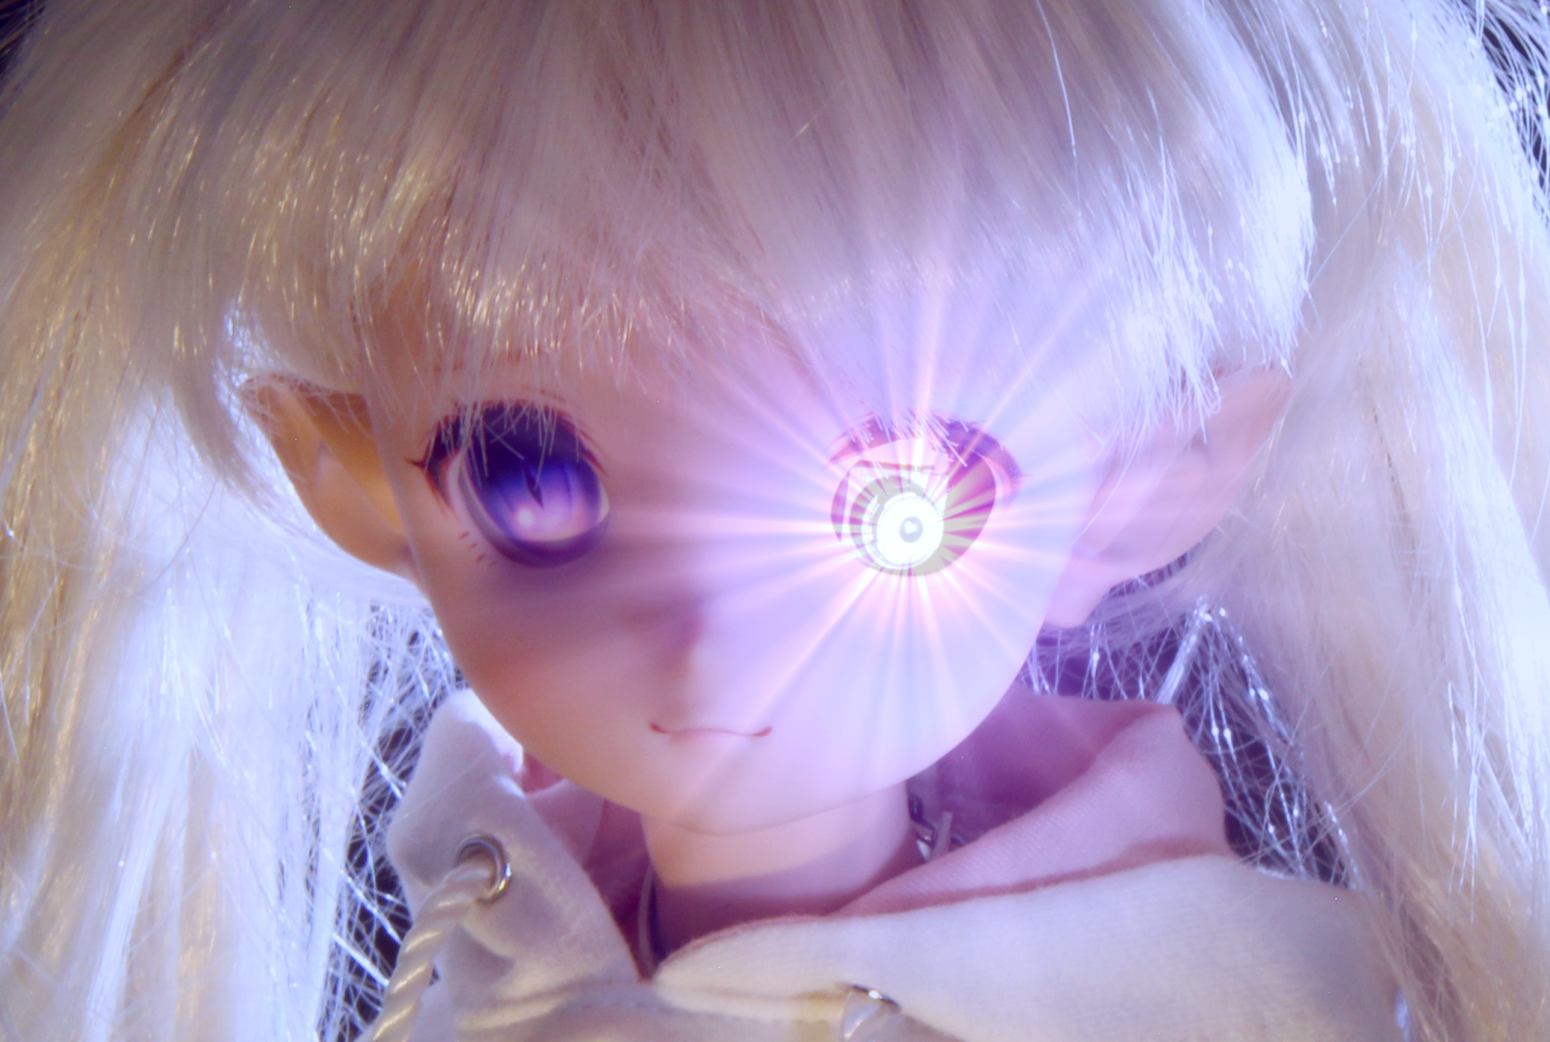
The doll I’ve used is a Mini Dollfie Dream (MDD) custom with DD-H-21 head. Dollfies are excellent for this project because both their head cap and eyes are removable. If you’re interested in the doll itself then she’s called Misaki and I’ve written a review of her unboxing and arrival here. Incidentally, although all Dollfie Dream dolls have removable head caps, with most of them their eyes are glued into position so it can be a hassle to remove their default eyes. It’s quite a routine operation though, and once you do it you’ll be able to swap out your doll’s eyes anytime you want to.
Disclaimer: just remember the camera module gets warm during use so ensure it doesn’t melt your precious doll!
If you want to get all fancy then there are a number of different camera lenses you can plug into the ESP32 CAM module. The type that might be most useful are the ones with 7.5cm leads which would potentially give you a lot more flexibility when it comes to placing the camera lens itself. There are also lenses with different focal lengths and I believe they do a fish-eye lens. There is also apparently a night vision lens too, which sounds intriguing.
Another tip I have is that if you want to make a motion activated spycam this is pretty easy. All you’d need to do is hook up the camera module to either an HC-SR04 ultrasonic sensor or a HC-SR501 PIR motion sensor. Both are very easy to configure, and they only cost a couple of dollars each.
I’ve tried to make this tutorial as easy as possible to follow. If you encounter any issues then leave a comment below or on the Youtube video itself and I’ll try to compile them all into an ESP32 CAM troubleshooting video.
Most common issues I’ve encountered:
- The mini USB A cable is just a power cable not a data cable.
- After uploading code to the ESP32 CAM board the GND to IO0 cable is not disconnected.
- Wrong COM port selected on PC.
- Wrong board type selected in Arduino IDE.
- Wrong camera type selected in code.
- Wifi network issues (e.g. wrong SSID or password).
- Viewing cam output in multiple browser windows.
- The ESP32 CAM is busy/has crashed – press the reset button on the module.
- Webcam is only available on the local wifi network (unless further modifications are made). So you won’t be able to tell your friends the wifi’s URL and get them to log into it.
Some useful links:
- Here’s the ESP32 CAM wiring diagram I use in the tutorial.
- Download the Arduino IDE for Windows, Linux and MacOS.
- The ESP32 board manager URL is this: https://dl.espressif.com/dl/package_esp32_index.json
Behind the Scenes
I found the ESP32 CAM pretty easy to get up and running, and I had a lot fewer problems than I did when I was programming the ST7735S TFT screen on the Arduino Uno.
Having said that, I’ve found the ESP32 CAM to be quite a, uh, cranky module. I actually had to fake some of the final scenes in the video because once I had fitted the spycam into Misaki’s head I found it would only work for a few minutes and then it would stop working.
I’m still not sure what the issue is but one thing I did notice while testing is that the webcam control panel only seems to work if a single web browser is logged into it. Also I suspect that the ESP32 CAM powers down when not being used and it’s possible the router assigns it a different IP address when it starts up again. This may just be an issue with my particular router though.
If you’re comfortable with logging into your wifi router then I would strongly recommend you assign a fixed IP address to the webcam on your network, particularly if you’re actually going to be making use of the camera to monitor your house on a regular basis. Unfortunately I couldn’t seem to figure out how to do this, but it’s quite possible it’s just a quirk of my particular broadband provider’s router. I’ve had no issues assigning fixed IP addresses to my PlayStation and PC, but the ESP32 devices never seem to appear in the list of connected devices.
Anyway, I hope you find this video tutorial useful. If you have any questions or tips about the ESP32 CAM then please do leave a comment below or on the video’s comments section. Just remember to only use your hidden spycam as a force for good!